- Hardware & Software Requirements
- DNS Prerequisites
- Installing Axigen on Linux
- Installing Axigen on Linux (Axigen X2 & X3)
- Installing Axigen on Windows
- Deploying & Running Axigen in VMware & VirtualBox
- Deploying & Running Axigen in Docker
- Performing the Initial Configuration (Onboarding)
- Starting / Stopping / Restarting Axigen
- About Axigen's Architecture
- Services and Modules
- Supported OS / Platforms and Web Clients
Axigen stores each created domain in a unique domain location. The default location in Axigen is:
-
/var/opt/axigen/domains– for Linux -
C:\Program Files\Axigen Mail Server\domains– for Windows.
When adding message storages for a domain, it is recommended to allow a minimum of 25% overhead for stored emails. For example, if an estimated 20GB of emails will be stored in that message storage, then the maximum allowed size for that message storage location should be at least 25GB.
You can add multiple message storage locations using WebAdmin (when creating the domain) or CLI (within the domain creation context). When using CLI, the command to create multiple message storage locations is as follows:
To create a new domain, please follow the steps below:
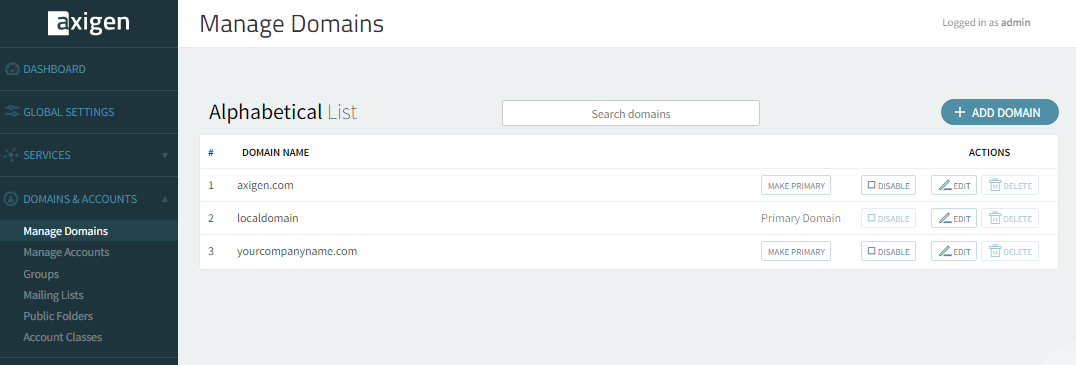
1. Click on the "Manage Domains" tab. The following page is displayed.
2. To add a new domain, hit the "Add Domain" button displayed in the upper right corner of the domain list.
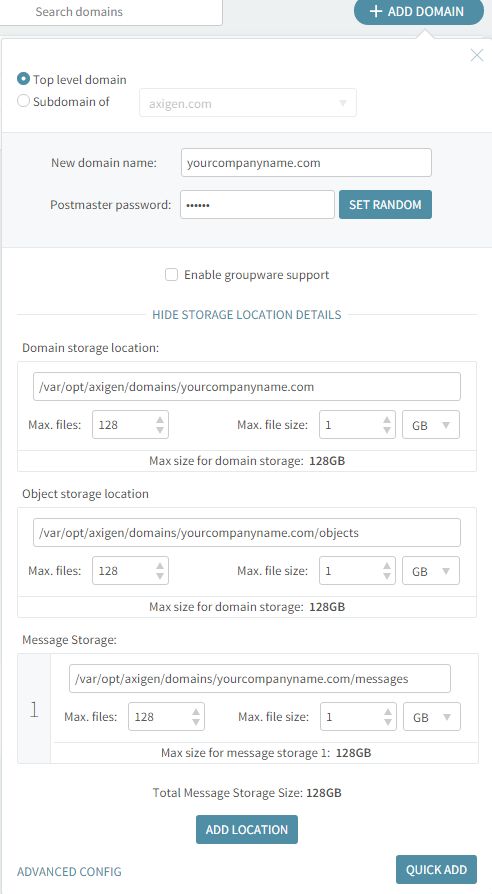
3. Select one of the options available: "Top level domain" or "Subdomain of" an already defined domain.
4. Type the domain name.
Axigen is RFC compliant in terms of characters you can use when creating new domains and / or accounts. Please refer to the relevant RFC standard, Internet message format, available here: http://www.faqs.org/rfcs/rfc2822.html
5. Specify a password to protect the selected domain in the "Postmaster Password" text area or click the "Set Random" button to select a random password combination. When using this button the password randomly assigned is displayed under it.
6. Check the Enable MACL Support option so users in belonging to this domain will be able to set different permission levels on their folders in order to share them.
7. By clicking the "Show" button you can add extra message storage. It is recommended to use the default values for "Max files" and "Max file size".
8. Hit the "Quick Add" button to have the domain created with all the default parameters or hit the "Advanced Config" button to edit the domain-specific parameters according to your preferences. The following page will be displayed:
9. Click the "Save Configuration" button to save your changes.
You have successfully created a new domain. You can see the domains you have created on the server at any time by clicking the "Manage Domains" tab.
After defining your first domain, it will be set as primary domain. This will be considered your default domain for all incoming mail. You can make any domain primary at any time by pressing the corresponding "Make primary" button in the Domain list.


