The "Account Classes" → "Quotas and Restrictions" page contains parameters relative to the mailbox and folder level, notifications to be sent to users, and restrictions imposed for all created account classes.
Changing the parameters below will affect the accounts that have inherited parameters. Explicitly set parameters will not be affected.
Managing Account Quotas
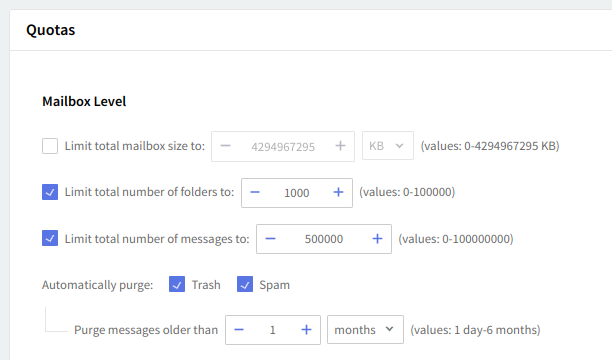
At the mailbox level, the total mailbox size, the total number of folders, and the total number of messages can be limited by selecting the respective options in the "Mailbox" area and using the up and down arrows to adjust the limits to the desired value. For the total size limit, use the available drop-down menu to select if you want it calculated in KB, MB, or GB.

In addition, you can have older messages in the Trash and/or Spam folders automatically purged, based on age criteria. By default, this option is enabled to purge messages older than 1 month.

Set limits for the size of each folder and the total number of messages per folder by checking the respective options in the "Folders" section and using the up and down arrows to adjust the limits to the desired value. For the folder size limit, use the available drop-down menu to select if you want it calculated in KB, MB, or GB. The maximum possible value for "total size limit" is 1 KB lower than 4096 GB.

To notify the account user (through a pop-up displayed when accessing the WebMail interface) when a certain level of the allowed quota is reached, check the respective option in the 'Notifications' area and edit the default percentage. You can also choose to have the user notified at every login via an email and control the frequency of these login notifications. The frequency of these login notifications can be set using the up and down arrows corresponding to this additional option. To select if the respective value is calculated in minutes, hours or days use the respective drop-down menu.

You can further edit the notification content in the "Notification email content" section. This section will only be displayed after checking the box related to the "Also send a notification email each time the user logs in but no more frequently than every..." option. The "Quota limit notification file name" section will contain the EML file that will be sent when the quota limit is reached.
Another option is to restrict the user from sending any new emails when he reaches a specific used quota percentage. By default this is set to 0%, so the user will be able to send emails until he reaches his quota. The percentage you set for this option must be higher than the quota usage warning percentage.
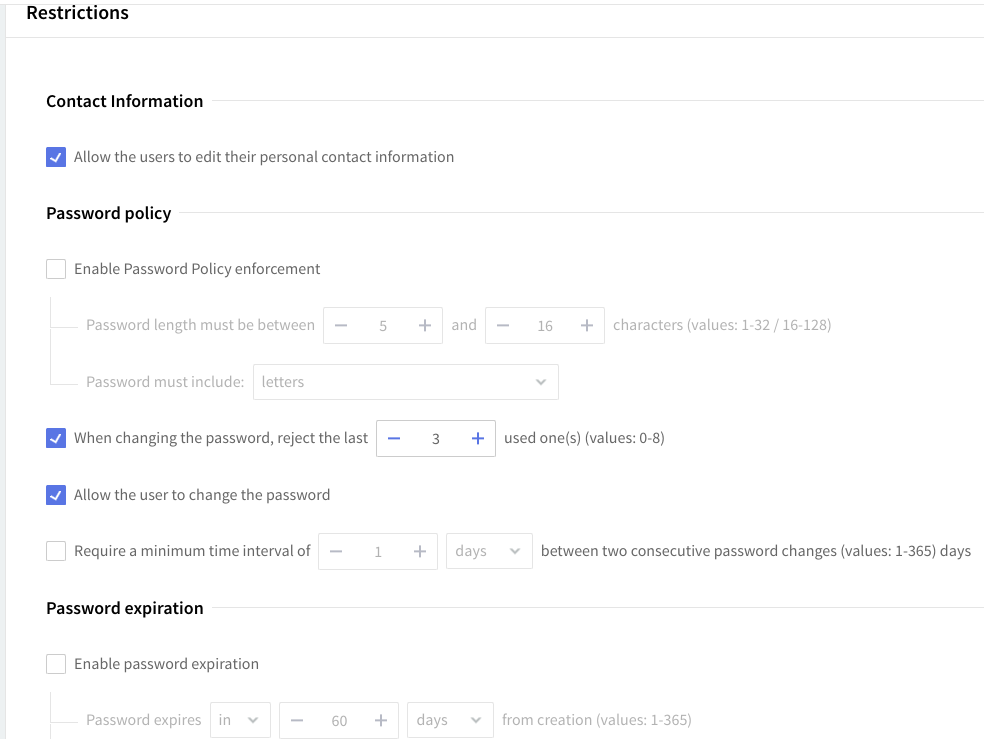
Contact Information
In this section you can disallow the user from changing it's personal contact information, restricting access to the corresponding contact details.
Password Policy Enforcement
You can define a Password Policy to be enforced for the currently created account. First of all, a minimum and maximum number of characters for each password can be set using the up and down arrows or directly editing the "Password length parameters" text field. Further, select from the Password must include a dropdown menu if passwords should include letters, letters, and numbers or letters, numbers, and special characters. You can also set specific password-changing options like the number of previous passwords that should not be accepted as the new password, a minimum period between two password changes, and if the user is allowed to change the password.
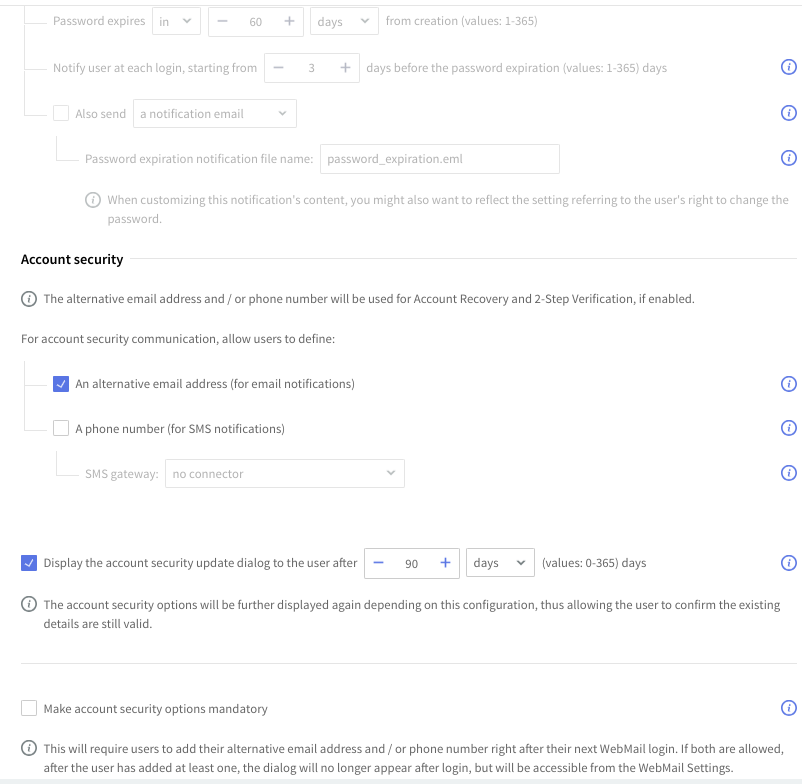
Password Expiration
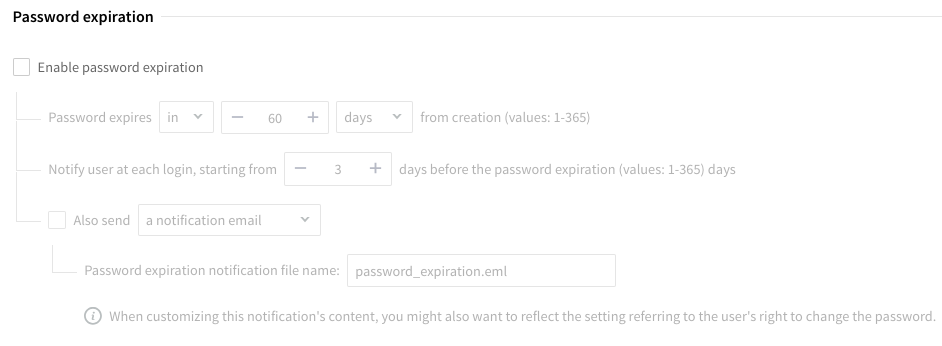
In this section you can enable, by checking the related box, the "Enable password expiration" option and then customize the password expiration and related notifications in compliance with your requirements.
2-Step Verification
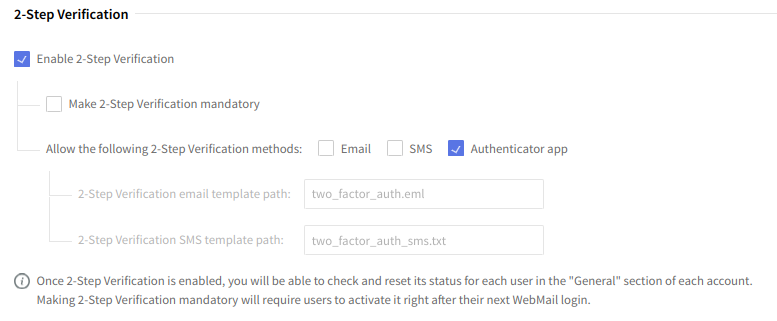
2-Step Verification Settings
This section allows administrators to configure 2-Step Verification (2SV) settings to enhance account security for users.
-
Enable 2-Step Verification:
-
To activate 2SV, check this box. Enabling 2SV allows users to add an extra layer of security to their login process by using a secondary verification method.
-
-
Make 2-Step Verification Mandatory:
-
Enabling this option will require all users to set up 2SV immediately after their next login. If left unchecked, 2SV will remain optional for users.
-
-
Allow the following 2-Step Verification methods:
-
Choose one or more methods for 2SV:
-
Email: Sends a 2SV code via email.
-
SMS: Sends a 2SV code via SMS.
-
Authenticator app: Generates a code via an authenticator app (such as Google Authenticator).
-
Note: Only the methods that are enabled will be available to users for verification.
-
-
2-Step Verification email template path:
-
Specifies the file path for the email template used in 2SV emails. This field is active only if the Email method is selected.
-
-
2-Step Verification SMS template path:
-
Specifies the file path for the SMS template used in 2SV SMS messages. This field is active only if the SMS method is selected.
-
Important: After enabling 2-Step Verification, you can manage and reset 2SV settings for individual users in the "General" section of each user account. Making 2SV mandatory will prompt users to activate 2SV upon their next login to WebMail.
Account Recovery
You can allow your end-users to recover their username and/or reset their forgotten password by using the following methods:
-
Personal Email Address (PEA) or SMS — allows users to define an SMS phone number and a Personal Email Address that will be used in case they lose access to their account. These options can be added in their WebMail settings, by going to General → Account Info for the SMS number and More for filling in the “Personal Email Address” field.
From this section, you can decide which methods you allow your end-users to make use of, as well as set the path on the disk to the email templates that are used for the automated emails sent within the recovery process.
Session Restrictions
The number of POP3, IMAP, and WebMail sessions can be limited for the respective account. To do so select the desired value, use the up and down arrows, or directly edit the text fields pertaining to each type of session.
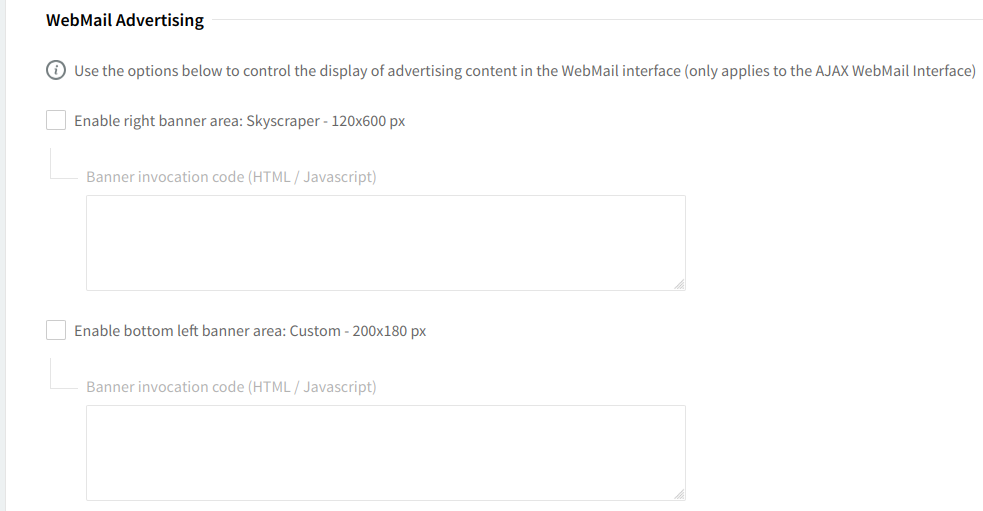
In the WebMail advertising area, you can configure the two advertising sections of the interface (only about the Ajax WebMail interface) by inserting appropriate HTML code in the corresponding parts. We recommend respecting the maximum size specified for each section.
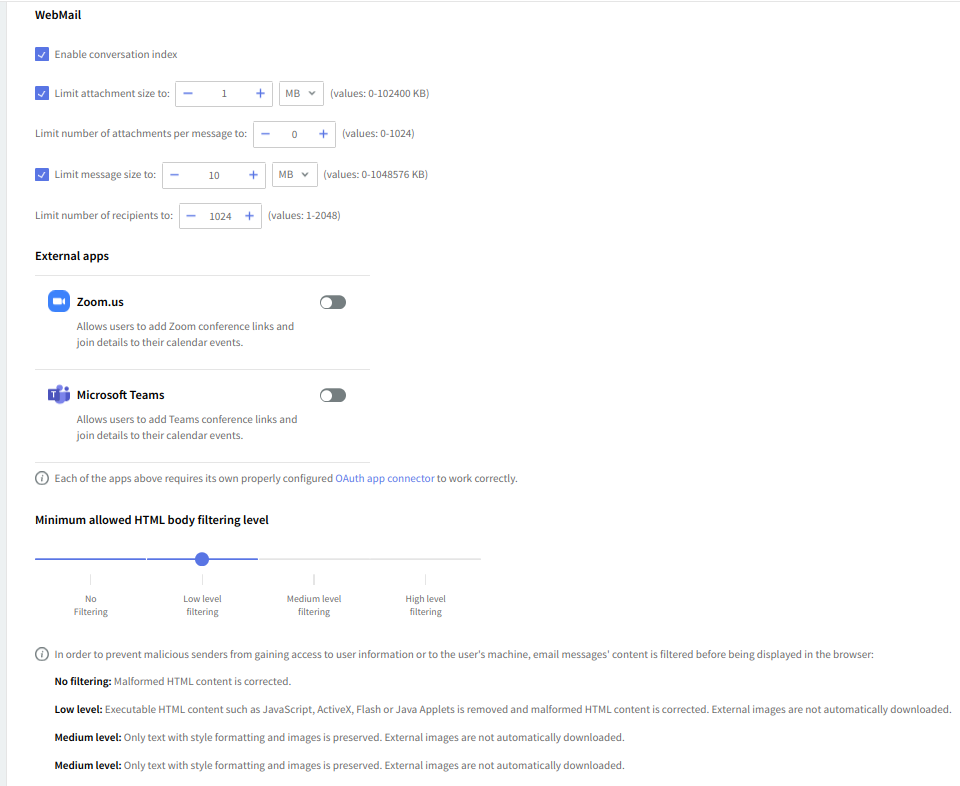
External apps allow users to add Zoom and Microsoft Teams conference links and meeting details to their WebMail calendar events, but only after the administrator has both configured and enabled the Zoom and/or Microsoft Teams integration.
To limit the size of email message attachments, check the respective option in the WebMail section and use the up and down arrow to select the desired size. To have the size measured in KB, MB or GB use the available drop-down menu.
Use the up and down arrows of the "Limit number of attachments per message" option or edit its corresponding text field to set a maximum number of attachments allowed to email messages sent or received using the WebMail interface
Check the "Limit message size" option to set a maximum size for sent and received messages through the WebMail interface. To do so either use the up and down arrows to select the desired size or edit the corresponding text field.
The "Limit number of recipients" option allows you to configure a maximum number of recipients for WebMail email messages using the up and down arrows to select the desired size or edit the corresponding text field.
To set the "HTML Body Filtering Level" for this specific account when connected via WebMail use the available slider. The HTML filtering levels stand for the following:
-
No Filtering;
-
Low level filtering – converts the message to standard XHTML;
-
Medium level filtering – generates the email body based on a list of known/allowed attributes and tags. Anything that is not on this "allowed list" is removed. This level removes javascript, styles, etc.;
-
High level filtering – generates the email body based only on text components. This means that only plain text components remain in the message. This fourth level is the strictest and may actually damage some formatting, but it is also the safest.
A minimum email body filtering restriction can be applied by dragging the "Minimum allowed HTML Body Filtering Level" slider to the desired setting. This will not allow the user to set the email body filtering level (from WebMail) to a lower value than the one specified in WebAdmin.
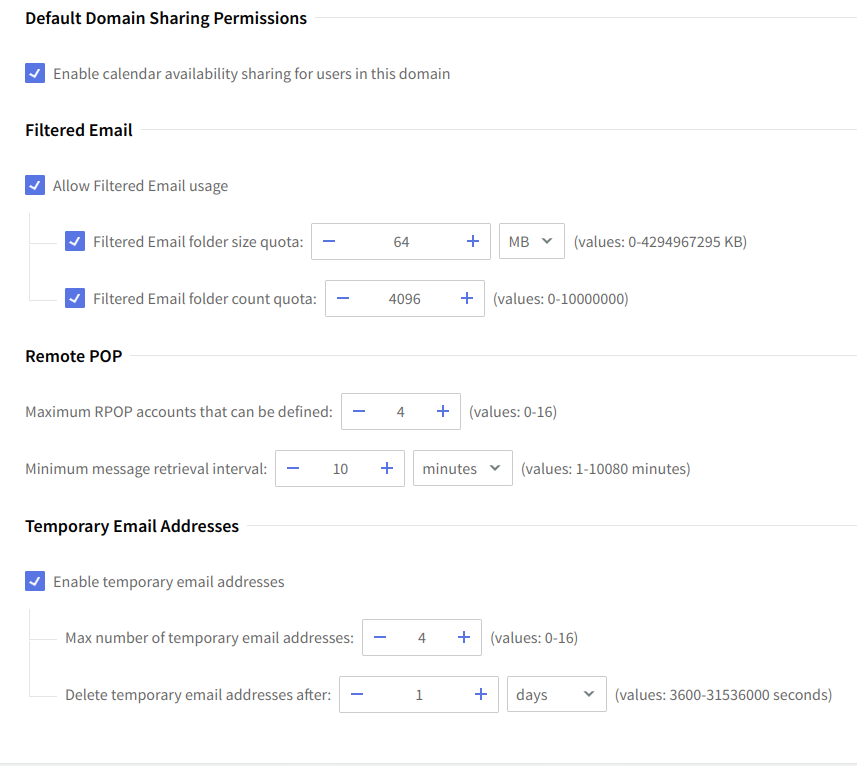
The permission to use Calendar availability sharing for users in this domain can be disabled or enabled from this section, by checking/un-checking the related boxes.
Remote POP Restrictions
You can limit the number of remote POP accounts defined by a certain user. To do so, use the up and down arrows to select the desired size or edit the corresponding text field. Additionally, a minimum interval between two email retrievals for each RPOP connection can be specified. Use the "Minimum message retrieval interval" drop-down menu to have it calculated in seconds, minutes or hours.
Temporary Email Addresses Restrictions
You can set some limits regarding the usage of temporary email addresses. A user may request a maximum of 16 temporary email addresses (aliases), if the limit is set to "0" the "Add" button in WebMail (in the "Temporary Email Addresses" section) will be disabled but the old temporary email address will still be available until they expire or are deleted. The period from the creation of a temporary email address to its automatic deletion can be set between 10 minutes and 1 year.
Parameter inheritance: the parameters or parameter groups that are inherited from the domain's account defaults are automatically marked with the "Inherited from domain's account defaults" icon, while the ones inherited from an account class are marked with the "Inherited from account class" icon. When explicitly setting the value of an inherited parameter, it will be marked with the Set explicitly icon. Moreover, any further changes at the parent level (domain's account defaults or account class) will only affect inherited parameters, while explicitly set ones will keep their value. You can revert the explicit parameters to their inherited value at any time by clicking the "Inherit" link related to the explicitly set parameter (orange) icon.
Icons:
Once your changes are complete, save them by clicking the "Save Configuration" button.


